Subscribe to Pleasure in Simple Things via RSS ReaderFollow Pleasure in Simple Things on InstagramFollow @InSimpleThings on TwitterLike Pleasure In Simple Things on FacebookFollow Pleasure In Simple Things on PinterestEmail Jackie

diy pumpkins with foraged materials

October 13, 2020

book and baby boo

When I was young, I would love to save colorful fall leaves by using a hot iron to preserve them between two pieces of wax paper.  Do children still do this?

baby boo with orange leaves

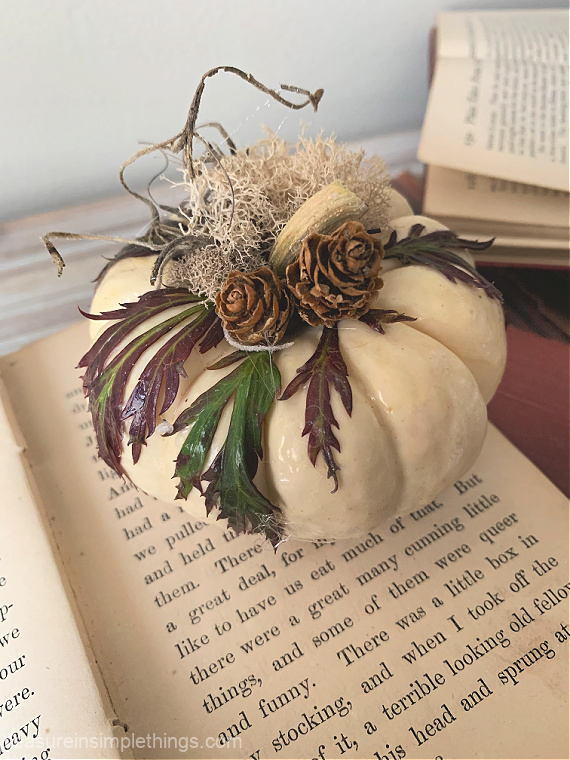
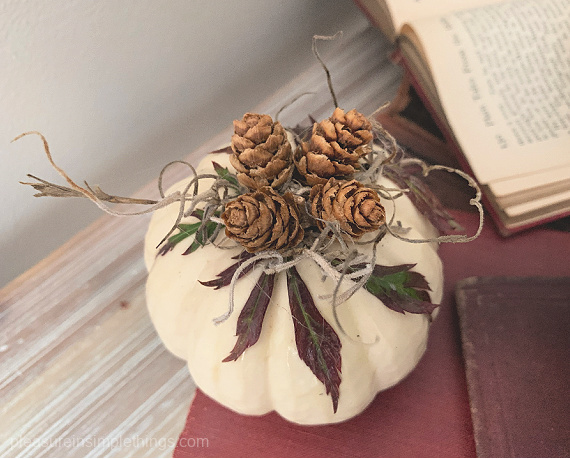
I used a similar technique recently to save some leaves I admired.  Instead of wax paper, I used Mod Podge as a preservative and added them to mini baby boo pumpkins.

foraged burgandy on baby boo

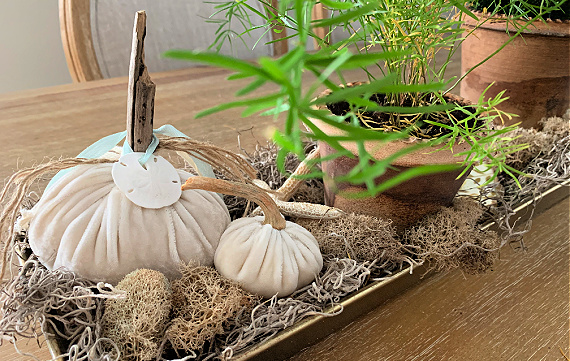
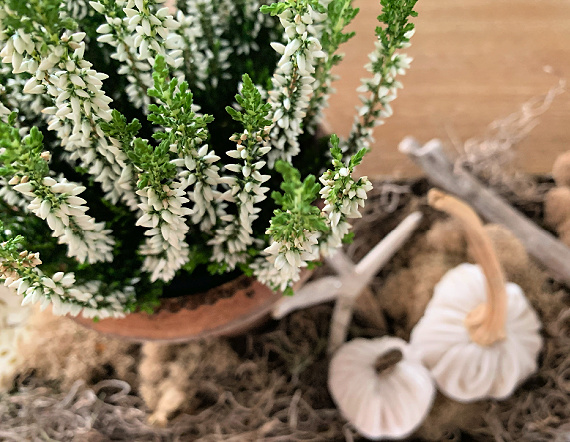
I had foraged some items that caught my eye on a morning walk and I really wanted to use them in some way.  So, I decided to incorporate the items I found, as well as some small pine cones (I had previously bleached) and acorns (I had previously painted), as ornamentation on white baby boos pumpkins.

fall foraging

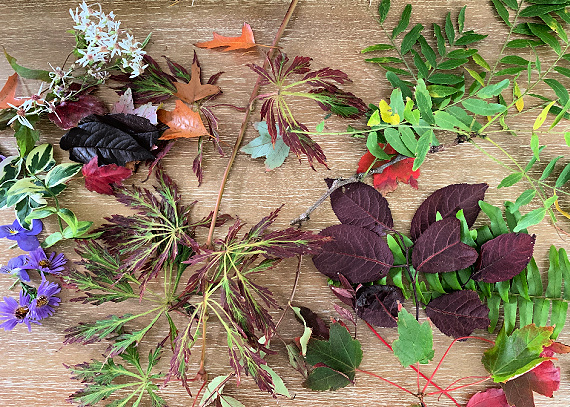
This is such an easy DIY that anyone can do.  There are so many possibilities!  All you need are some foraged items from outdoors, a glue gun, Mod Podge and some pumpkins.  Mod Podge isn’t even necessary, but I used it to glue down some of the leaves and also to preserve them.  I brushed the Mod Podge on both sides of each leaf and glued some of the leaves to the surface of the pumpkin.

baby boo with acorn

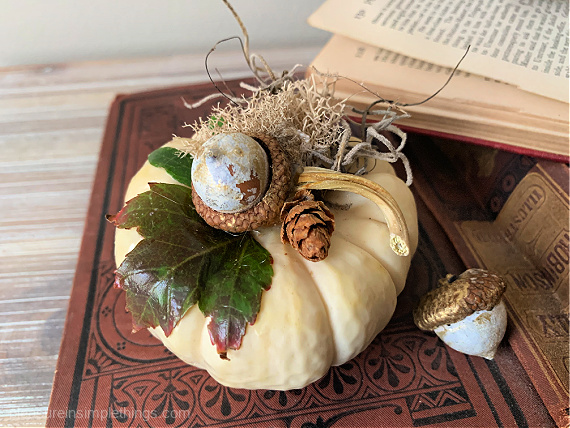
Using found materials and a 69-cent pumpkin (from Trader Joe’s), this DIY is super affordable!

baby boo with acorns

I hope I have inspired you to create some of your own pumpkin creations from foraged materials!

foraged materials on a baby boo

Thanks for stopping by.

Remember to take pleasure in simple things, Jackie

no comments

fall chair planting diy

October 2, 2020

chair plantings

Today I am hoping to inspire you to plant a chair.  Yes, you read that correctly!  An old chair is the perfect vehicle to create a beautiful fall planting.

empty chair

First, find an old chair.  I mean old!  The older, the better – more character.  It should be a chair that has (or once had) a caned seat or an upholstered seat.  The reason for this is because you will remove that part to add plants.

empty chair

The perfect candidate for a chair planting!

Once the cane or upholstery is removed, screening is stapled in its place using a staple gun.  After the screening is in place, planting can happen!  Just like any other outdoor container would be used, the screening serves as your container, providing drainage.  So easy!

chair with screen

screen closeup

Before planting, decide if the chair you plan to use will be left vintage looking or if you will paint it in advance.  A bright color, a color to match the flowers used, or a color to match your house or garden are all great choices.

purple chair planting

I was inspired to start this project based on the photos here.  I have plenty of colors of Annie Sloan paint and plan use that to paint a chair in advance of planting.  I am keeping my fingers crossed I can find an appropriate discarded chair in the next week!

blue chair planting

I hope I have inspired you to start a chair planting of your own!

yellow chair planting

Thanks for stopping by.  Have a wonderful weekend!

Remember to take pleasure in simple things, Jackie

no comments

can’t stop fall

September 18, 2020

white velvet pumpkins

We had a couple of cool days here in Connecticut and I couldn’t resist taking out some fall décor.  Not that I have very much!  Because I always resist acknowledging fall, I have never accumulated that much in décor to celebrate it!  But I do have a box filled with velvet pumpkins I’ve made and I also own a few pumpkin pillows in neutral colors.

white heather to fall decor

So, on one of the recent cool weather days, I took out my box of pumpkins on my lunch break and used them to update the fern centerpiece on my dining room table…basically, I just added some pumpkins and replaced one of the existing ferns with a white heather.  Then I placed a few of the pumpkins in other rooms of the house.

ferns and pumpkins

Enough of a change to have something new to enjoy.

gray pumpkin in bathroom

A little gray pumpkin in the bathroom.

pumpkin in the kitchen

A little white velvet pumpkin on display in the kitchen.

Have you done anything with your home décor to celebrate the upcoming change in season?

Thanks for stopping by.

neutral pumpkin pillow

Remember to take pleasure in simple things, Jackie

P.S.  As I hesitate to acknowledge fall, HomeGoods already has Christmas merchandise on display!

no comments

diy tank top pumpkins

September 4, 2020

gray teeshirt pumpkin

Every year it is sad for me to sew my first pumpkin because I love summer so much and pumpkins, of course, are a sign of a coming season that is not summer!

Each year, in addition to the velvet ones I make, I like to create some pumpkins from a unique material.  This year, I decided to use some repurposed clothing.

round gray topIsolation provided for some time to organize everything in my home, and I went through my collection of clothing many times since the pandemic started – fine-tuning all my closets.  Because I tried my best to hold on to only those items I truly love, I ended up with a large donation pile of unwanted clothes.

pumpkin made from gray teeshirt

When I started to think of this year’s pumpkins, I immediately thought of the unwanted clothes pile – the perfect place to find some new material!  To start, I chose two J. Crew tank tops.  Both in colors I love and both with embellishments that could be added to the finished pumpkins.

pumpkins from pink tees

round pink topThe pink one has the added appeal of being perfect to make pumpkins to display for breast cancer awareness month!

So…the pumpkins begin!

pink tank top pumpkin

pumpkin sewn from pink tee

Thanks for stopping by!

Remember to take pleasure in simple things, Jackie

no comments

bananas over ice pops

June 16, 2020

banana ice pop

You know I love ice pops and I have tried so many different flavor combinations over the years.  One of my favorite all-time flavors for anything is banana, so it wouldn’t be right not to make up some banana pops at some point over the summer!

These are actually a really great summer breakfast!  Bananas and almond milk – sounds like a healthy breakfast to me!

plate of banana pops

Yogurt, regular milk, or coconut milk can be used in place of the almond milk if you prefer.  The almond milk (because of the lack of fat) will make an icier pop and the regular milk makes a creamier pop.  I use the almond milk for my own pops to make a guilt-free treat.  In the summer I would rather eat a banana this way!

banana peelsBanana Ice Pops (about 5, 3 oz. pops)

  • 3 cups ripe bananas
  • 1 cup milk of choice
  • 1 teaspoon vanilla
  • Dash of salt

Blend all ingredients until smooth.  Pour into ice pop molds and freeze as directed or overnight.

When I have ice pops on hand to offer to guests, I take them out of the molds and package them individually in advance – ready to go in my freezer!

packaged banana pops

Drizzling banana ice pops with chocolate shell makes them a great summer-time dessert!  And, there are so many variations possible!  If you have children or grandchildren you want to impress, you can coat the pops completely in chocolate shell and then quickly roll them in crushed up breakfast cereal for an extra special treat!

collage of pb ice popsHere, I used homemade chocolate shell (click here for the recipe) and crushed up peanut butter/chocolate breakfast cereal – banana, peanut butter, and chocolate go well together!  Use your imagination to make up other combinations!

fancy banana ice pop

Thanks for stopping by!

Remember to take pleasure in simple things, Jackie

no comments

mint mojito ice pop

June 9, 2020

ice pops mojito

I very rarely drink alcohol, but I love a good virgin drink – especially a frozen one!  This pop is like combining the two!  Enjoy a refreshing Mojito with none of the calories of a cocktail!

one mojito ice pop

mojito ice pop recipe

Calorie Count

  • Mint Mojito:  over 200 calories
  • Mint Mojito ice pop:  under 30 calories

Cost

  • Mint Mojito: $10.+
  • Mint Mojito ice pop:  use your own garden ingredients and spend under $1.

holding a mojito ice pop

I hope you are inspired to try these pops or your own creation!  Thanks for stopping by!

Remember to take pleasure in simple things, Jackie

no comments

easy garden diy

June 5, 2020

pretty bird and diy

Some years back, I blogged about some easy DIY garden stakes based on some I had seen.  On a recent visit to my friend Wendy’s garden, I noticed she had added a bird to one of these stakes in an arrangement she created for her side door.  It is SO adorable, I need to share!

bucket of white flowers

You can read the original post/tutorial by clicking here if you’d like to create your own.  Just add a cute bird like Wendy did!

pretty bird and diy

Thanks for stopping by!

white clematis

Note:  The other photos in this post are also from Wendy’s gardens.  (Of course, I had to find a way to add some white flowers to the post!)

Have a fabulous weekend and remember to take pleasure in simple things, Jackie


no comments

table fern display

June 2, 2020

pretty fern arrangement

Without hosting any company for such a long stretch, my dining room table décor from Easter never got updated…what for?   A lot of home updates did get attended to during isolation – caulking, cleaning, filing, etc., but some of the seasonal décor definitely got neglected!

In an attempt to cheer myself up, I decided to get rid of the decorated Easter eggs and add something a little more appropriate to the season to my dining room table.  What better way to brighten spirits than  a trip to Terrain?!  I figured if I just bought a couple little indoor ferns, I could create something nice and low cost for my dining room table.

dining room ferns

Walking around Terrain’s nursery definitely helped pick up my mood – as it always does!  And, because I only needed some small ferns, I was able to leave without much of an investment.

My plan was to use some of my Ben Wolff white clay pots to make a simple fern display.  Ben Wolff is a potter that does some amazing work.  I was never a fan of the traditional color clay pot, (click here and/or here to see two ways I have painted them!)  and since I am about all things white, his white clay pots are perfect for my aesthetic!  (His gray pots are also beautiful!  I am lucky that Ben’s studio is right here in Connecticut – close enough to visit and purchase my pots directly from the studio!

ferns on table

I simply planted the ferns in the white pots and arranged them down the middle of the table with some moss.  Easy and so beautifully satisfying!  The components are anchored in a 3-foot-long trough I purchased at Terrain many years ago.  I use it all the time and it is perfect to protect the table from seasonal arrangements.  (I don’t think the exact one I have is still available for purchase, but if you search ‘trough’ on the Terrain website, you should find some great alternatives!)

ferns with watering can

(To make my arrangement complete – I just need to find the pretty little terrarium rocks I have to cover the top of the dirt in the pots.  If I can’t find where I put them, I will use some little shells or sea glass.)

fern arrangement

I hope I have inspired you to add some new seasonal décor to your home – company or no company!

Thanks for stopping by!

starfish with fern

Remember to take pleasure in simple things, Jackie

P.S. The white watering can is Smith and Hawken from Target.

no comments

decoupaged oyster shell magnets

May 26, 2020

flower oyster shell

A great use for smaller decoupaged oyster shells is as refrigerator magnets.  All that is required is to use a glue gun to add a strong magnet to the back of the completed shell!  For complete instructions on making the decoupaged oyster shells, click here.

decoupage oyster shell fridge magnet

While they were offering a site-wide discount during the quarantine, I ordered some super strong small, round magnets (as well as some ribbon for a future project) online from Joann Stores.  You should be able to find small magnets at this or any craft store.

oyster shell magnets

Decoupage the shells in a pattern/color that coordinates with your décor!  Even if you decide to use shells that are all decoupaged in the same pattern – each is unique in shape, providing plenty of visual interest on the fridge!

fridge magnets oyster shells

I hope you are inspired to DIY some decoupaged oyster shell fridge magnets!

shell magnets from oyster shells

Thanks for stopping by!

Remember to take pleasure in simple things, Jackie

Using decoupaged shells to make a pendant necklace, click here.

no comments

decoupaged oyster shell pendant necklace

May 19, 2020

oyster shell sweater combo

How many oyster shell trinket dishes can one person use?  After making quite a few of these beauties during quarantine, I started coming up with some other ways to use these decorative pieces.

Living in a spot where oyster shells are readily available makes it easy to go a little overboard when using them in a craft!  I love the way the shells come out when decoupaged, so I needed to start coming up with some additional uses for them other then what I’ve done in the past.

There are plenty of ways to use masses of shells – in a wreath…or, even as I have shown you in the past – as ground cover in place of mulch – but this time, I am utilizing shells in a way that highlights each one individually.  Because, once decoupaged, each oyster shell is so unique and beautiful, a great way to highlight an individual one is to make it into a necklace, using the shell as a pendant.

decoupaged oyster shell pendantAfter the shell is decoupaged (full tutorial here), simply add it to a chain or a piece of leather.  Here, I have added beads to a chain.  Wooden beads are also a great choice – some natural colored wood beads highlighted with a few painted gold would have set off this shell nicely!

The only real challenge with creating a necklace is to add a hole to the shell.  I say challenge because of the shape and texture of the shell.  Caution is required so that the tool you are using does not slip.  And, because of the texture of the shell, caution is also required so as not to split the shell while drilling.

ootd necklace oyster shell decoupage

I made this necklace to go with one of my favorite sweaters…just need to add some gold sandals and white jeans and I have a super OOTD!

Probably the best and safest way to make a hole in a shell is with a Dremel using water.  Because of quarantine, the only tool I had available for my project was a regular drill.  I used a masonry bit and held the shell with some pliers so that if the drill slipped, it wouldn’t drill through my hand!  Like I said, caution is required!

If you plan on making a habit of putting holes in shells, I suggest you purchase a Dremel and follow the instructions very carefully!

Decoupage shells in colors/patterns that coordinate with your wardrobe and create some great statement necklaces!

Thanks for stopping by!

Remember to take pleasure in simple things, Jackie

no comments

« Previous Entries     Next Entries »